Contribution tips: Difference between revisions
(Created page with "How to submit a technically optimized contri: ==Easy idiot-proof Step by Step Guide by Igor== ===Taking the Pictures === 1 - Set your digital camera to its highest reso...") |
(No difference)
|
Revision as of 21:08, 2 September 2012
How to submit a technically optimized contri:
Easy idiot-proof Step by Step Guide by Igor
Taking the Pictures
1 - Set your digital camera to its highest resolution (largest file size) when taking pictures.
Processing the Pictures
After downloading the pictures to your computer: Do all required steps below one after another - do not save any preliminary changes of your original to continue later - every time you save and re-open your work for more changes you lose quality!
1. Open the photo using your photo processing software. As an example I will use Adobe Photoshop here.
Here is the original photo from the camera (for copyright reasons it shows a watermark, which of course does not belong there). It has a file size of 1.1 Mbits and it has dimensions of 3000 by 2000 pixels. Your shot may be bigger if your camera has a higher resolution.
2. Rotate the picture clockwise or counterclockwise if required. My photo is now rotated counterclockwise to 2000 by 3000 pixels.
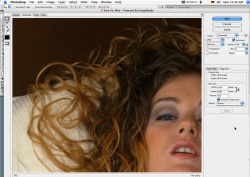
3. Crop down to the image area you like on the picture without using a preset dimension.
3a. Here is how I selected my crop tool on Photoshop. Notice I did NOT enter any dimensions and entered a default resolution of 72 pixels/inch (DPI).
3b - Select the area you would like to crop and then double click the area. My image has the dimensions of 1609 by 2300 pixels. That is perfectly fine.
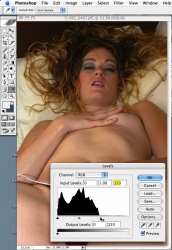
4. Adjust the levels of the picture. Select "Image" - "Adjust" - "Levels".
You will see the following "Histogram" curve.

You see a high curve on the left and a flat curve on the right. That tells us, the picture has many "dark" color variations and no bright white colors - it is "underexposed". It also tells us that the overall light weight is not balanced - it is all on the dark side. We adjust that simple by moving the RIGHT slider to the left until it reaches a point where the curve above it starts climbing. You will notice your photo becomes much more bright when moving the right slider.
Play with left and right slider until all areas of your pics look brilliant. Leave the center slider alone. Then click "DONE".

5. Save as... Never overwrite the original. Under no circumstances "sharpen" your image - it will have an opposite effect when we process your pics. Same with most of the other filters, especially color filter, contrast, god knows what, until you know exactly what your doing. Now we come to the final saving of your work for the file you want to submit. You do not need to change dimensions; all you do is select "Save for Web" under Photoshop. I use 100% quality and you can see the dimension are still 1609 by 2300 pixels. If saving for e-contri or BB postings, decrease the dimensions and adjust the quality to get a file size that is within the limits of where you are uploading.
6. Done. That is exactly the file you are going to submit. Lets open the file to have a look at it before we submit it (Do not do any changes now - only look).

The photo processing crew will recognize it is a high-resolution shot, will watermark it, get it into the proper dimensions for our pages and so. It will look sharp and crispy and brilliant when published. Here is the final result if we would publish that photo:
Easy super-idiot-proof only 2-Steps-to-remember Guide by Igor:
Taking the Pictures
Set your digital camera to its highest resolution (largest file size) when taking pictures. Make sure you shoot exactly what you want to display.
Processing the Pictures
You don't need to do any type of processing (99% of all cameras deliver the format we need). Simply upload the pictures you want to display without touching the pics. If you need anything done to any of the pics leave a message for the photo processing crew. For example: "Crop this image so it does not display the fridge at the left", "Remove the license plate of my car". That's it. The less you do the less errors you can make.
If you use iPhoto or other software to process your pics
Exporting the Pictures
Export at regular size at high quality (which means low compression). Do not save or export "for email" or "for internet". That will create tiny little blurry pics. Here is are the standard setting you should use for iPhoto:
Details for the Experts
Sizes/Dimensions
Do not submit photos with a shorter side length of less than 1000 pixels. For a full frame pic this means minimum dimensions of 1500 x 1000 pixels.
Published sizes
Voyeurweb's maximum displayed size is 1000 pixels on the longer side. However, due to compression on our end, the larger your file is the less impact our compression will have.
Submitting at high resolution or at final size
Try to avoid submitting at final size - go for the largest size instead. Photos are usually scaled down from their original size during the publication process.
Formats accepted
JPEG only. Go for "Low compression" or "High quality" which means huge file sizes.
Color spaces
All color spaces are accepted, like sRGB, Adobe RGB, ProPhoto RGB. All color spaces are removed when Voyeurweb processes the picture.
8 bit, 16 bit, 24 bit or 48 bit color
Always go for 24 bit total color or better. sRGB and Adobe RGB use 8 bits per channel, or 24 bits total color. ProPhoto uses 16 bits per channel, or 48 bits total color. Most computer monitors can only display 24 bits of color anyway, so which color space and bit count to use is a moot point.
Compression
JPEG is a compression format. No need to Zip. Go for "Low compression" or "High quality" which means huge file sizes.
Sharpening
Never use sharpening; it is the worst tool you can use. It will have the opposite effect when VW recompresses your work for publication.
Shooting in RAW
See here for a detailed discussion of shooting in RAW.